How to Stock Water in Cement Water Jars: Unterschied zwischen den Versionen
(Die Seite wurde neu angelegt: „==Übersicht== Übersicht übernommener Howtopedia Artikel, Zum Übersetzten Artikel , How to…“) |
K (Schützte „How to Stock Water in Cement Water Jars“ ([Bearbeiten=Nur automatisch bestätigten Benutzern erlauben] (unbeschränkt) [Verschieben=Nur automatisch bestätigten Benutzern erlauben] (unbeschränkt))) |
(kein Unterschied)
| |
Version vom 23. Juni 2021, 12:22 Uhr
Inhaltsverzeichnis
Übersicht
Übersicht übernommener Howtopedia Artikel, Zum Übersetzten Artikel , Zum originale Artikel
Cement Mortar Jar 1.0 m3 Capacity - A Case Study - Technical Brief
Short Description
- Problem:
- Idea:
- Information Type: Application / Principles
- Difficulty:
- Price Range:
- Material Needeed:
- Geographic Area:
- Competencies:
- How Many people?
- How Long does it take?
Introduction
This Case Study is taken from ‘Rainwater Harvesting - The collection of rainfall and runoff in rural areas’, Pacey and Cullis by IT Publications, 1986. Information has also been used from a recent EU funded Water and Sanitation Programme in Tanzania.
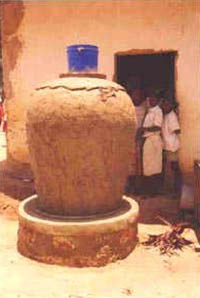
This type of water container was originally developed in Thailand but has also been used widely, often with modifications, in East Africa. Many variations on this type of tank have been developed over the years.

Figure 1: 'Thai Jar' being built as part of a water and sanitation programme in Tanzania
Construction details
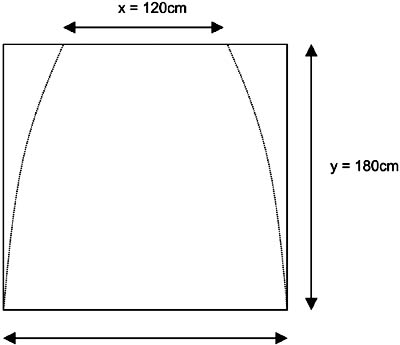
The mould or formwork for a 1m3 cement mortar jar is made from 2 pieces of gunny cloth or hessian sacking, cut and stitched together with twine as shown in Figure 19. After sewing, the resulting bottomless bag is turned inside out.
• To make the bottom of the tank, mark out a circle on the ground of 1m diameter and place ½ bricks or other suitable material around its circumference to act as a formwork.
• Spread paper or plastic sheeting on the ground within the circle to stop the mortar sticking. Mix a 1:3 cement: sand mortar and spread within the circle to a depth of 15mm.
• When the bottom plate has set, place the sacking bag narrow end down on the plate and begin filling it with sand, sawdust or rice husks. Make sure that the mortar base sticks out from under the sack and tuck the edges of the sacking under the filling material, so that the weight of the filling holds the sacking on the plate.
• Fill the sack, fold the top and tie it closed. Then fold and smooth the sack into a regular shape. Make a circular ring from wood or cement mortar and place this on top as the formwork for the opening in the top of the jar.
• Spray the sacking with water until it is thoroughly wet, then plaster on the first layer of cement mortar to a thickness of up to 10mm.
• Plaster on the second 5 - 7mm layer in the same manner as the first, checking the thickness by pushing a nail in. Build up any thin spots.
• Remove the sack and its contents 24hrs after the plastering is completed. Repair any defects with mortar and paint the inside of the jar with cement slurry. Then cure the jar for 2 weeks protecting it from sun and wind under damp sacking.
General information
This type of jar can be manufactured in any size. However, as the tank size gets bigger the mould becomes unwieldy, and different methods have been devised for making the former. One such example saw the construction of 1.8m3 jars using specially made curved bricks to construct the formwork. The blocks are built into shape using mud as a temporary mortar and are then removed once the tank is complete. The formwork can then be reused again and again.
In East Africa, the use of chicken mesh between the first and second coats of plaster is a common addition which gives extra strength to the structure and helps prevent crack propagation. This type of ferrocement tank can be loaded onto a truck for delivery, and therefore has the advantage that it can be made centrally for later distribution. Watt, 1978, gives detailed instructions for the construction of a 0.25m3 jar in ‘Ferrocement Water Tanks’. He suggests that similar tanks can be built up to 4m3 in size. The smaller mortar jars replace the traditional ceramic Thai jars and can be manufactured at about a tenth of the price. The quality of workmanship for this type of jar should be of high standard, as any flaws in the jar can quickly result in failure.
Material requirements
The quantities below are taken from a similar 1m3 jar used during a recent water and sanitation programme in Tanzania. This tank had reinforcing and a tap and a washout fitted.
|
Materials |
Unit price |
Qty |
Cost |
|
(TSh) 1997 Prices |
(TSh) | ||
|
Cement (bag) |
6,200 |
2 |
12,400 |
|
Chicken wire (roll) |
25,000 |
0.25 |
6,250 |
|
Binding wire (kg) |
900 |
0.50 |
450 |
|
G.I Pipe 1" (m) |
2,000 |
1 |
2,000 |
|
G.I F-F connectors 1" |
300 |
2 |
600 |
|
G.I. Elbows |
185 |
2 |
370 |
|
Locking Tap 1" |
2,500 |
1 |
2,500 |
|
G.I. Male plug 1" |
800 |
1 |
800 |
|
(2100 TSh. = £1 Sterling at the time of writing) |
Total |
35,220 | |
*sand and stone are not accounted for here as they were provided by the community as part of a self-help initiative.
** approximately 1 skilled and 1 unskilled person days are required per tank.
References and further reading
This Howtopedia entry was derived from the Practical Action Technical Brief Energy from the Wind.
To look at the original document follow this link: http://www.practicalaction.org/?id=technical_briefs_
Useful addresses
Practical Action
The Schumacher Centre for Technology & Development, Bourton on Dunsmore, RUGBY, CV23 9QZ, United Kingdom.
Tel.: +44 (0) 1926 634400, Fax: +44 (0) 1926 634401
e-mail: practicalaction@practicalaction.org.uk
web: www.practicalaction.org

Related Articles
- How to Build an Underground Brick Dome Water Tank
- How to Build a Water Tank
- How to Purify Water with Chlorine Tablets
- How to Filter Water with a Sand Filter
- How to Lower Water Turbidity with a Roughing Filter
- Water Cleaning Principles
- How to Harvest Run Off Rainwater
- How to Harvest Rainwater
- How to Stock Water in Cement Water Jars
Deeplink:
http://en.howtopedia.org/wiki/How_to_Stock_Water_in_Cement_Water_Jars
